


Join industry-leading companies, individuals, and DAOs


Features
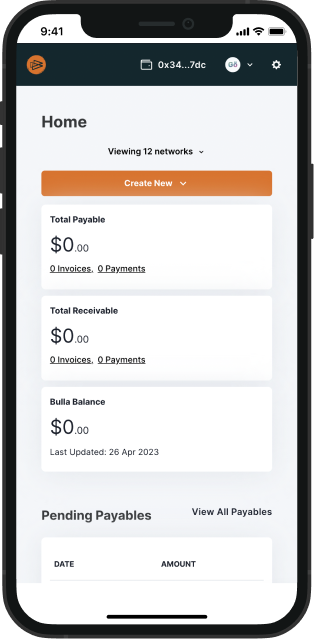
The future of on-chain accounting
Bulla is the #1 on-chain invoicing and accounting platform across chains like Ethereum, Optimism, and more.
Import your transactions
The Bulla Transaction Importer allows anyone to start leveraging Bulla’s features for both future and past transactions.
Purely permission-less
Bulla makes no centralized compromises, and is proud to be 100% on-chain. All you need is a non-custodial wallet to start.
Invoice globally with ease
Using on-chain tokenized invoices, Bulla implements “triple entry accounting” for the cleanest, most reliable cash flow management possible.
Taxes made easy
Make your life easier next tax season with comprehensive reporting of all your transactions across 11+ chains.

The people are talking...


14+ Networks
Operating on-chain, on all the chains.
Don’t let a single transaction fall through the cracks. Bulla tracks your finances across 14+ different blockchains and manages them with decentralized tech.


DeFi Traders
Keep your trades in order across 11+ chains with Bulla’s fully on-chain transaction management. Easily track and organize your trades for tax season.
Web3 Freelancers
Request on-chain payment from clients, manage your cashflow, and stay organized for tax season. Bulla is the fully on-chain accounting platform for web3 freelancers.
Crypto startups
Manage payroll across the globe with Bulla’s on-chain invoicing and payments. Bulla is your personal on-chain CFO.

In our fast growing company, Bulla saves me a lot of time in the monthly payroll process. The support and speed of development of Bulla is awesome.
— Peter ten Zijthoff
CFO, Coorest